Wall Elevations in Interior Design Projects
How Ergonomics and Anthropometry Turn a Drawing into a Scenario Validation Tool
- 28 april 2026
- 3569
At a certain point, an interior designer stops being surprised by their clients. They start being surprised by the drawings. More specifically — by how easy it is to overlook the obvious on them: a passage between the sofa and the wall turns out to be too narrow, a socket ends up behind the refrigerator, and a shelf above the desk hangs exactly at head level.
A wall elevation is one of the few documents where these mistakes can still be caught before finishing begins. But only if it shows not just the walls and furniture, but also an understanding of how people with different anthropometric data interact with the space.
In Planoplan, this is solved by two things: a flexible elevation editor (for walls, floors, and ceilings) and the ability to place people on the drawing — not abstract ones, but those suited to a specific scenario. How they work together and why this is a fully functional professional tool is explained below.
What Is a Wall Elevation and Why Doesn't It Tolerate Guesswork
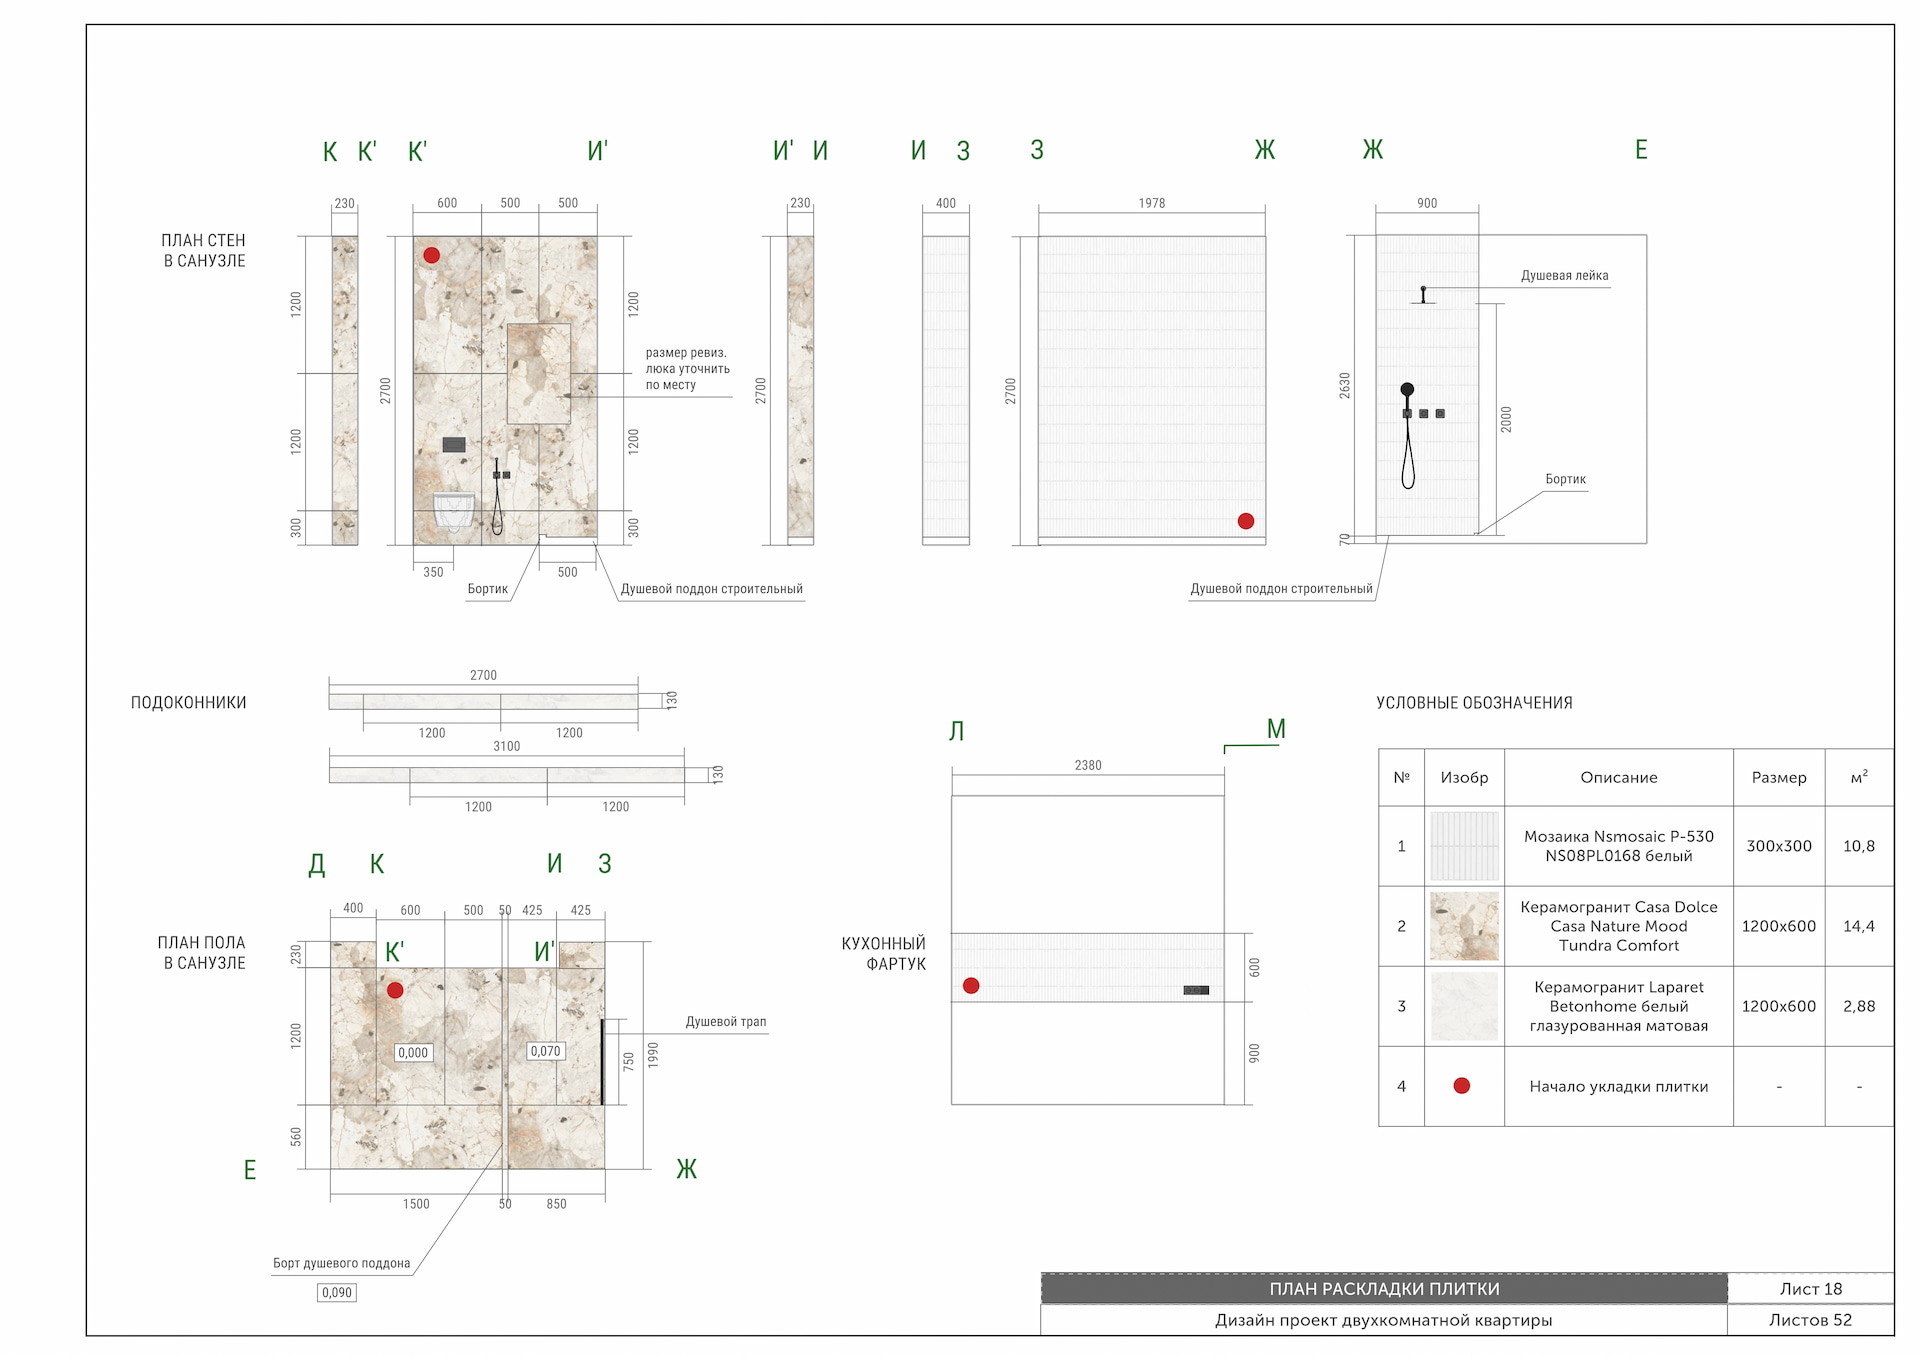
A wall elevation is an orthogonal projection of a room onto a plane. Simply put, each wall is "unfolded" into a flat drawing at a single scale. This includes windows, doors, built-in and freestanding furniture, electrical sockets, light switches, and decorative elements.
Such a drawing serves three fundamentally different functions.
For builders, it is an instruction set. Renders are useless on a job site because they lack dimensional references. An elevation provides exact coordinates: at what height a socket is located, where the tile starts and ends, and how materials are joined at the corners.
For calculations, it is a measuring tool. Using an elevation, you can calculate wall areas for painting, wallpapering, or plastering, deducting openings. Without it, purchasing finishing materials turns into a high-stakes gamble.
For quality control, it is a safety net. It is on the elevation that you can see a sofa blocking a radiator, a passage narrowing to 50 cm, or a light switch ending up behind an open door. And on such a drawing, the client immediately understands why you can't just "slightly nudge" the wardrobe.
In Planoplan, an elevation is not drawn from scratch. It is generated automatically based on the 3D model, while still giving the designer full control over its presentation. More on this in the next section.
How the Elevation Editor Works in Planoplan
The software has a mode that allows you to work with wall, floor, and ceiling elevations. Access it via 3D mode from the settings window of the corresponding object. Any changes you make to the layout or furniture arrangement are automatically updated in any open elevation. This eliminates the situation where the drawing has a life of its own, independent of the model.
The Editor Interface includes several key elements:
- Room Mini-map: Helps you quickly identify which wall you are currently viewing. Clicking on a wall highlights it in all views.
- Freely Positionable Walls on the Canvas: You are not tied to a rigid grid—you can drag walls and arrange them in a way that is convenient for printing or presenting.
- Drafting Tools Kit: Includes Dimension lines, Polylines (for outlining complex zones), Callouts with explanations, Shapes, Text blocks, Tables, and Image insertion. All these elements "stick" to the wall—if you move the wall, they move with it.
- Flexible Visibility Management: You can hide windows, doors, or skirting boards individually. This helps you create different versions of the drawing: for yourself, for the client, or for the construction crew.
Export to JPG or PNG. Before saving, you can choose the aspect ratio (standard A4, A3, and custom sizes up to 8000×8000 px are available), orientation (portrait or landscape), and which elements will appear in the final image.
Why Ergonomics on an Elevation Isn't About Using Manuals from the Last Century
Space planning traditionally relies on anthropometric data. Three reference points are most often used: measurements for a short, average, and tall person. In the professional field, these are known as the 5th, 50th, and 95th percentiles.
This system works, but with a caveat. Most of the detailed ergonomic tables that are still copied from book to book were compiled decades ago. Back then, the home was considered a purely functional unit. One 20th-century architect, Le Corbusier, put it in the harshest possible terms: a house is a machine for sleeping, eating, storing, and hygiene. Four functions, no extra complexity.
Today, the approach has changed unrecognizably. A space should reflect a person's lifestyle, their work, hobbies, and family rhythms. One room might combine a remote work zone, a children's corner, an exercise area, and a classic living room. Old standards don't account for such multitasking—they simply weren't designed for it.
Therefore, a modern designer certainly keeps basic dimensions in mind (passage width, counter height, shelf depth). But the final decision is made not by looking at state standards, but at the specific person and their scenarios. And this is precisely where the elevation becomes the ideal testing ground.
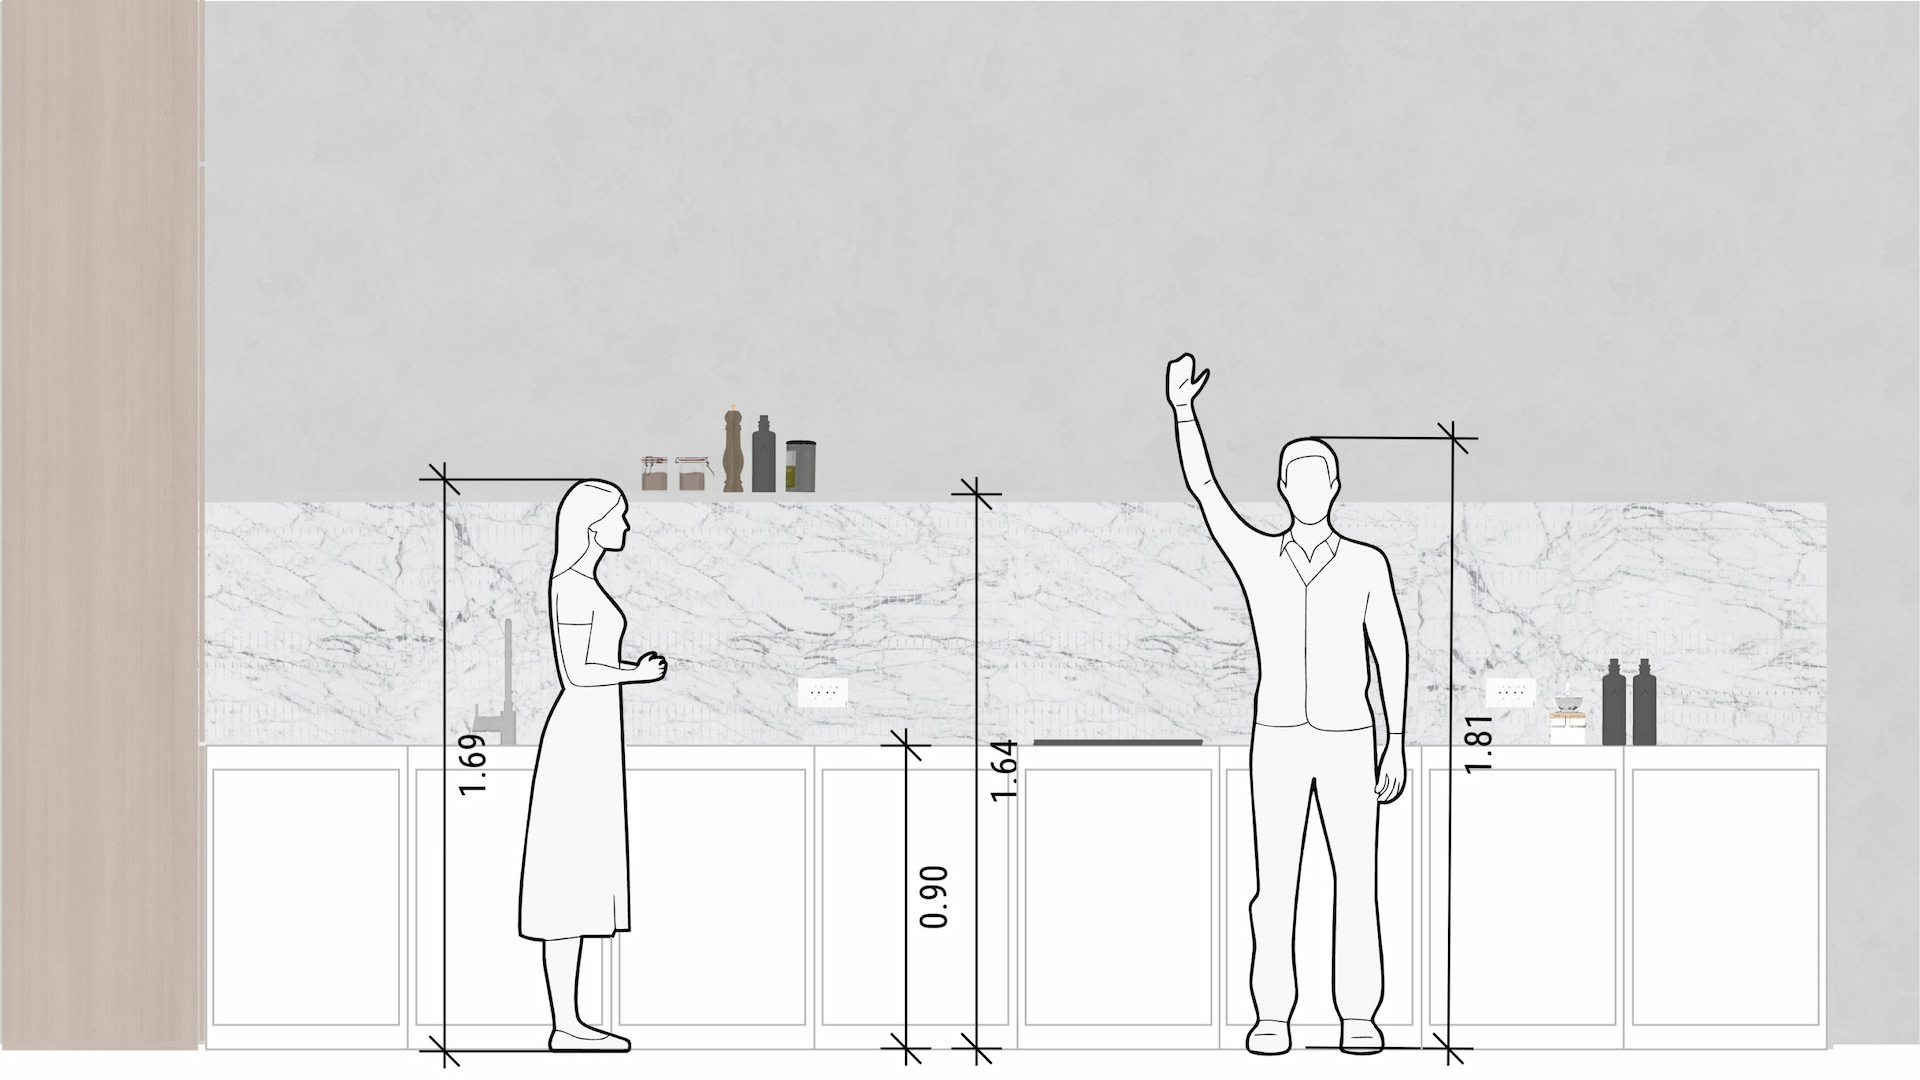
People on Elevations: How to Stop Guessing and Start Seeing
In the Planoplan catalog, there is a section called "Markings on the Plan," and within it, a subsection called "People." This isn't just a single schematic figure for scale, but a whole set of options that can be dragged and dropped onto the plan or elevation.

Why is this necessary if the designer already understands everything?
It's one thing to know that a passageway should be at least 60 cm. It's quite another to see on the drawing how an average-height person bends down to a bottom drawer while their head disappears under a wall-mounted shelf. Or how a cabinet door, when opened, hits an elbow. Or how the area around an ironing board becomes uncomfortable for a tall family member.
This function allows you to:
- Check the Ergonomics of work zones (kitchen, bathroom, office).
- Show the client the physical reality of interacting with the interior before the walls are even built.
- Compare different scenarios — one person, two people, someone holding a child, or someone in a wheelchair (if relevant).
The regulatory framework remains the foundation. But a drawing that includes not just walls and furniture but the person themselves ceases to be an abstraction. It becomes a document that genuinely protects against mistakes.
Conclusion
An elevation rarely takes center stage in an interior design project. But it is often what saves the project from rework. In Planoplan, this drawing doesn't need to be drawn by hand or redrawn every time the layout changes. Moreover, the presence of various human markings in the catalog transforms the elevation from a static image into a tool for validating movement, gestures, and everyday habits. Try the elevation editor in your next project. It might just be the thing that helps you notice what previously escaped your attention.

Many colleagues know and value Planoplan for its powerful visualization tools. However, I'd like to share another, no less important aspect of the program — creating professional drawings and plans. Through personal experience, I've found Planoplan to be very convenient for working on all project documentation, and I'm ready to show you how. Read the article